Installing Porcelain Tile Step by Step

Transforming your living spaces with the elegance and durability of porcelain tiles requires more than just laying them down. It’s a delicate art that demands attention to detail, careful preparation, and the right techniques. Whether you’re a seasoned DIY enthusiast or a newcomer to the world of tile installation, this comprehensive guide will equip you with the knowledge and skills to elevate your home with a flawless porcelain tile setup.
From precise tile layout to troubleshooting potential challenges, this guide will walk you through every step of the process. Unlock the secrets to achieving a professional-grade finish, as you navigate the intricacies of subfloor preparation, adhesive selection, and grout application. Prepare to embark on a journey of transformative home improvement, where your vision meets the timeless beauty of porcelain tiles.
Dive into a world of tips and tricks that will empower you to tackle even the most complex tile installations with confidence. Discover the art of creating seamless patterns, managing expansion joints, and ensuring the longevity of your porcelain tile setup. Embrace the journey and let this comprehensive guide be your trusted companion in unlocking the full potential of your living spaces.
Key steps for a successful installation
Achieving a flawless tile layout is crucial for any home improvement project. This section will guide you through the essential steps required to ensure a triumphant tile setup, offering practical tips and a comprehensive tutorial to help you navigate the process with confidence.
Preparation is the foundation for a successful tile installation. Carefully planning the layout and ensuring the surface is clean, level, and properly prepared are key factors in achieving a seamless final result. By following a structured approach and incorporating industry-proven techniques, you can elevate your tiling endeavor and transform your living space with a polished, professional-grade finish.
From selecting the right adhesive to mastering the art of cutting and grouting, this comprehensive guide will equip you with the knowledge and skills needed to tackle your tiling project with ease. Whether you’re a seasoned DIY enthusiast or a newcomer to the world of home renovations, the insights provided here will empower you to navigate the installation process with precision and confidence, resulting in a stunning and long-lasting tiles.
Porcelain Tile Tutorial
Welcome to our porcelain tile tutorial! In this guide, we will provide you with tips and troubleshooting advice to help you successfully set up and install your porcelain tiles. Whether you are a novice or experienced in tile installation, this tutorial will offer valuable insights to ensure a smooth and professional-looking finish.
From preparation and layout to grouting and sealing, we will walk you through each step of the tile installation process. We will also address common issues that may arise during installation and provide solutions to overcome them. By following our tutorial, you will be equipped with the knowledge and skills needed to achieve a flawless porcelain tile installation in your home.
A step-by-step guide for beginners
If you’re new to the world of ceramic surfacing, the prospect of installing a floor or wall may seem daunting. However, with the right approach and a bit of guidance, you can easily transform your space with a beautiful, professional-looking finish. This tutorial will walk you through the essential steps, offering helpful tips and troubleshooting advice to ensure a successful project.
- Preparation: Begin by thoroughly cleaning the surface and ensuring it’s level and free of any debris. Measure the area carefully to determine the required material and plan your layout accordingly.
- Adhesive Application: Choose a high-quality adhesive recommended for your specific ceramic material and application. Apply it evenly to the surface, using a notched trowel to create a consistently thick layer.
- Tile Placement: Carefully position the tiles, pressing them firmly into the adhesive and aligning them with your planned layout. Use spacers to maintain even grout lines between the tiles.
- Grouting: Once the adhesive has cured, mix the grout according to the manufacturer’s instructions and apply it generously, filling the gaps between the tiles. Use a grout float to ensure even coverage.
- Cleaning and Finishing: After the grout has had time to set, use a damp sponge to clean the tile surface, removing any excess grout. Allow the grout to fully cure, then seal the tiles if recommended.
Throughout the process, be attentive to any potential issues and refer to the manufacturer’s guidelines for troubleshooting. Remember, patience and attention to detail are key for achieving a professional-looking ceramic surface. With these tips and a bit of practice, you’ll soon be on your way to mastering the art of ceramic installation.
Porcelain Tile Tips
Navigating the world of porcelain tile can be a delightful and rewarding journey, filled with insights and techniques that elevate the process. In this comprehensive guide, we’ll delve into a collection of valuable tips and tricks to ensure a successful tile setup and installation, empowering you to transform any space with the timeless beauty of porcelain.
| Tip | Description |
|---|---|
| Proper Subfloor Preparation | Ensuring a level and smooth subfloor is crucial for a seamless tile layout. Carefully address any unevenness or imperfections to create a sturdy foundation for your porcelain tiles. |
| Adhesive Selection | Choosing the right tile adhesive or mortar is essential. Consult with experts or manufacturer recommendations to select the appropriate product for your specific porcelain tiles and project requirements. |
| Grout Haze Removal | After the tiles have been installed, be mindful of grout haze, a common issue. Utilize specialized grout haze removers or a gentle cleaning process to achieve a flawless final finish. |
| Cutting Precision | Precise tile cutting is key to achieving a professional-looking result. Invest in high-quality tile saws or hire experienced installers to ensure clean, accurate cuts around obstacles and edges. |
| Sealing for Protection | Applying a suitable sealer to your porcelain tiles can enhance their durability and resistance to stains, making maintenance a breeze. Follow the manufacturer’s instructions for proper application. |
By incorporating these valuable porcelain tile tips into your project, you’ll be well on your way to creating a stunning and long-lasting tiled surface that will impress and delight. Embrace the artistry of porcelain tile installation and unlock the true potential of your space.
Expert advice for a flawless finish
When it comes to working with porcelain, mastering the intricacies of tile installation is essential for achieving a professional-looking result. In this guide, we’ll provide you with expert tips, tutorials, and troubleshooting advice to help you navigate the challenges of working with porcelain tiles.
Porcelain Tile Setup
When it comes to setting up porcelain tiles, it is essential to follow a step-by-step guide to ensure a successful outcome. This tutorial will provide you with all the necessary information and troubleshooting tips to help you with the installation process.
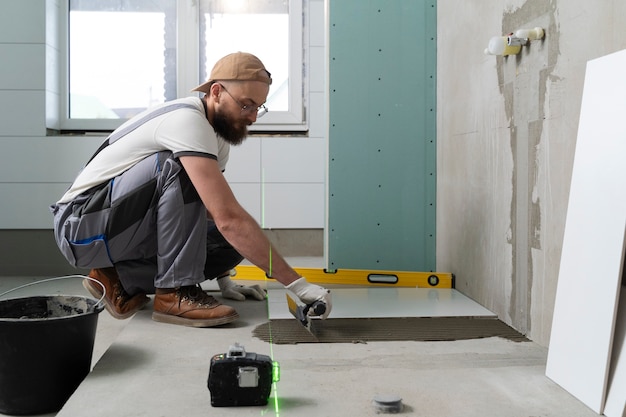
- Prepare the surface: Before starting the setup, make sure the surface is clean, level, and free of any debris.
- Apply the adhesive: Use the recommended adhesive for porcelain tiles and spread it evenly on the surface with a trowel.
- Set the tiles: Carefully place each tile onto the adhesive, ensuring they are properly aligned and spaced.
- Grout the tiles: Once the tiles are set, apply grout in between each tile to fill the gaps and create a seamless finish.
Throughout the setup process, it is important to pay attention to detail and take your time to ensure a professional-looking result. If you encounter any issues or challenges, refer to the troubleshooting section for helpful tips on how to overcome them. By following this guide, you will be able to set up porcelain tiles with confidence and precision.
Essential tools and equipment you need
When it comes to setting up your tile installation, having the right tools and equipment is crucial to ensure a successful outcome. This guide will provide you with a tutorial on the essential items you need to have on hand to troubleshoot any issues that may arise during the process.
First and foremost, you will need a variety of tile cutting tools to ensure that your porcelain tiles fit perfectly into place. A tile cutter, tile nippers, and a wet saw are essential for cutting and shaping tiles to your desired specifications.
Next, you will need a trowel for spreading adhesive evenly on the surface before laying down the tiles. A grout float will also be necessary for filling in the gaps between the tiles once they are set in place.
Additionally, having a level and chalk line will help you maintain straight lines and ensure that your tiles are installed evenly throughout the space. A sponge and bucket for cleaning up any excess grout or adhesive is also recommended.
Overall, having the right tools and equipment for your porcelain tile installation is crucial for a successful and seamless outcome. By following this guide and having these essential items on hand, you can tackle any troubleshooting issues that may arise during the process.
Porcelain Tile Guide
Welcome to our comprehensive porcelain tile guide, where we will provide you with tips, troubleshooting techniques, and a step-by-step tutorial on how to properly install and maintain porcelain tiles in your home. Whether you are a seasoned DIY enthusiast or a beginner looking to tackle a new project, this guide will help you navigate the world of porcelain tiles with ease.
Question-answer:
What are the benefits of using porcelain tile for installation?
Porcelain tile is durable, water-resistant, and easy to maintain, making it a great choice for high-traffic areas like kitchens and bathrooms. It also comes in a variety of colors and styles, allowing for endless design possibilities.
What tools do I need for installing porcelain tile?
Some essential tools for porcelain tile installation include a tile cutter, trowel, spacers, leveling system, grout float, and a rubber mallet. Make sure to have these tools on hand before starting your project.
What are some common issues that may arise during porcelain tile installation?
Common problems during porcelain tile installation include uneven tiles, cracked tiles, grout haze, and lippage. To avoid these issues, ensure that your subfloor is properly prepared and level before laying the tiles.
Can I install porcelain tile over existing tile?
Yes, you can install porcelain tile over existing tile as long as the surface is clean, flat, and free of any loose tiles or debris. However, it is recommended to consult with a professional to ensure the proper installation process.